 As many of you may recall from my article on my local carver Brian Kalnitz (https://theeagerbeaver.wordpress.com/2008/02/10/brian-kalnitz-the-work-of-a-local-artisan/), I have spent many months watching and learning from him. It began as a simple curiosity and evolved into an intense desire to produce the same works of art that I saw Brian creating. I have always had an attraction to art and the creation of it, although my definition of art may be different than most. My business, residential concrete work, in my opinion has always been artistic in nature. The process of taking blank canvas which is in the form of someones backyard and out of that creating a patio or walkway that incorporates with the landscape so that it looks as though it has existed there from the beginning. There is more put into the process than people may think. I have always prided myself on not just simply asking for dimensions, but asking a customer what they want to feel when they look out their window. This is how to truly create something that is from them, and simply brought to life by me.
I feel this same way with the carving process. I believe that the best artisans in the pipe community create with the desire and feelings of their customer in mind. I guess it can be said that any good artisan will do the same, whether painting, sculpting or art forms of the like. To me pipe carving is different, there is not just the creation of a piece of beautiful art that is attractive to the eye, but it creates a connection with the soul. The process of pipe smoking is not just a utilitarian process for most. It is ritualistic, a practice that soothes and relaxes and puts the smoker into a state of calm and introspection. It is an expression as well, a projection of the smoker in the shape, style and form of the piece’s that they enjoy. All of this is what appealed to me when deciding that watching and learning was not simply enough, it was time to “do”.
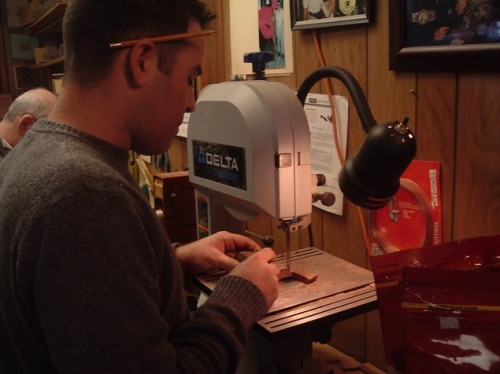
It was a simple enough process, asking Brian for a piece of wood so I could give it a go. After rooting through his boxes of briar he emerged from his office with a simple, non fancy piece of plateau. It was not high grade, as I simply wanted something to practice on. No point in spending $30 plus to ruin a perfectly good piece of briar. Obviously the first step was to look at the piece and make a few decisions. Shape and size and general design were all important parts of the process, and I wasted no time in choosing what direction to go. Within 10 minutes I was sketching out my shape onto the side of this block, and after inspection by Brian, was headed to the band saw to rough cut the shape. The projection of me as a smoker translates into one shape, a Dublin, so this is the direction that I decided to head with my first piece. I am familiar with this shape, I have held and inspected many and understand the proportions and the lines of a well executed Dublin. This is the shape that speaks to me most, and this little block of wood told me it wanted to become a Dublin.
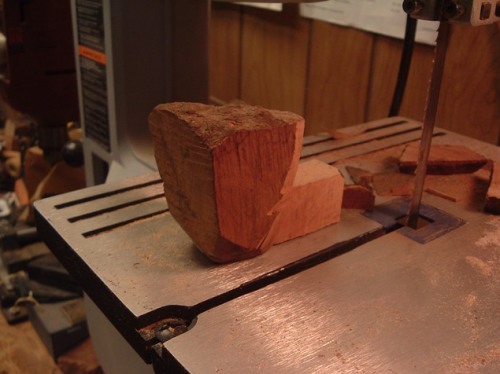
This process alone is more than most people know. Although only a rough shape, you must be sure to leave yourself enough wood to work with to fine tune the piece. It is very easy to visualize the finished product and rough-cut based on that. Next thing you know your left with a group 1 pipe that was not your vision at all. There is a satisfying feeling even when rough cutting the block. To see a shape evolve, though by no means close to a finished product, is exhilarating. Patience and care are the most important practices in this process. A cut to far can place a very large gash into the bowl or the shank and render the piece unusable. After finishing the cutting, the block did not resemble the Dublin very much, but I could see it, it was there, just waiting to be released. During the cutting a small flaw was revealed on the right rear side of the bowl close to the rim. This did not deter me, and in the event it renders the piece unusable, it will still be a trophy to my accomplishment.
Off to the sanding wheel I went with my little block of love. Rough sanding to develop the shape was the next required step. The first pad is rather aggressive, and will begin to remove briar in a way that will allow the shape to emerge. The downside is that this is when you start to see if flaws pop out, or in my case, how big the flaw really is. It was a little disappointing to see the flaw on the bowl grow as I sanded. I continued undaunted though, knowing that even the most beautiful things in life can be flawed. I often am amused by peoples snubbing of flaws in pipes, the opinion that a flaw simply ruins a pipe is not one that I share. Maybe I am partial because my own creation exhibits this, but there is still beauty in the piece. I think that even a flawed pipe can be gorgeous, maybe it is not on the same level of a perfect flawless smooth grade piece, however, there is a character that can show through on a well executed piece even with a flaw. Once again, I had Brian inspect the piece. He was impressed and a little proud I think of the progress. He said the proportions were well done, the lines were clean and straight (even for rough sanding) and overall a well formed piece. He examined the flaw and acknowledged that it could be an issue, but it was my decision as to whether to abandon it or continue. I of course chose to continue. I felt it just another challenge, and how I could incorporate that flaw to fit into the overall design.
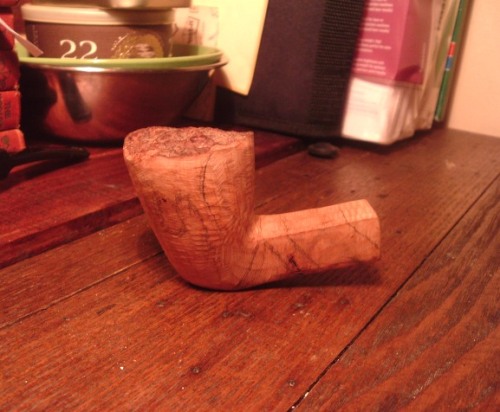
I continued on with fine sanding on the wheel. This is where some of the more delicate shaping comes in, and you can really tweak everything. You work on some of your transitions and the more delicate details. The pipe is by no means complete or even close at this point, just at another stage in the process. I used the fine sanding wheel to clean the lines on the shank and to soften the transition from bowl to shank a little. At this point, I started really getting a feel for the final look I expected from this piece of briar. There was some more sanding of the base of the bowl transitioning into the heel, and I decided at this point to give it a slightly angled flat bottom to carry trough to the square shank. I had already started thinking about what to do with the flaws on the pipe. The pitting on the bowl is rather significant, although at this point does not look to intrude on the chamber drilling, but only time will tell. There is a minor flaw on the left hand side of the shank as well, and it seems as though some rustication and fine detailing with a dremel or files will be in order. Overall I am pleased with the progress. The overall shape has come through and though the piece requires a little more thinning along the bowl and the shank and maybe a little narrowing of the curve to the heel, I am pleased with my work.
As you can see, there is still quite a bit to go into this piece. I have not yet been able to refer to it as a pipe, for the simple fact that it is not even close to what I want out of it. Usable or not this will be an experience that has been enjoyable, frustrating, exhilarating and satisfying. There is a certain sense of withdraw from your surroundings when you are involved in the process. Everything around you sort of fades into the background and you become interconnected both with the briar and the tools you are using. Sitting back after this portion of the process, there is a great deal of pride in looking at your work and knowing that it was your hands that did this, your heart and soul that developed this from a simple piece of wood into a beautiful, graceful shape. Even at this stage, in such rough form I find a great deal of beauty in this piece of wood, and find myself holding it, feeling the texture of it, running my hands over and around my creation. To imagine the final product is what draws me back to it. While it waits for the next visit to the shop it sits on my desk, never far from my sight or my grasp. It by no means will ever be unwanted or homeless. Functional or not this piece will always have a very special place in my collection.
Please stay tuned for the remaining parts of this series. I will be taking you through every step of this process right up until the end. Hope you enjoy !
~Justin


Justin,
Thanks for the tour! I want to make pipes as well very soon.
Can’t wait for the next entry!
Looks good Justin – can’t wait to see when you are done with it. Any idea how deep that flaw goes?
I’ve got this site bookmarked, so I will be following as we go!
Thanks Bri,
The flaw is actually pretty deep from what I can tell, but my hope is that its not deep enough to affect the chamber. Only time will tell I guess.
I have some ideas from incorporating the flaw into the design, Ill keep you all updated !
JB
Awesome design, J. I don’t think I’ve ever seen a square shank dublin before. Great shape, especially for not using a lathe to turn the bowl. Great job and you have a good eye and hands that do what you want them to (ever artists annoyance is hands that don’t want to cooperate)
Thank you for not using a lathe, Justin. That is very (classically) Danish of you 🙂
It’s great to see that you finally got around to try your hand at pipe making. Whatever happens, I hope you keep the enthusiasm!
Looking forward to reading the follow-up to this one.